Thursday, September 27, 2012

Pool in Perspective Figure Painting Mural


Cari Amici (Dear Friends),

There were many changes that happened during the process of actually painting my mural. Today I will talk about expanding the pool in the mural design. Having decided on the size of the woman wading in the pool, I just felt that the perspective was either not working or the pool just seemed too small.

Even though acrylic paint dries rather quickly, there are still degrees. It is a bit of a finicky material. So, a lot of how I have gotten done this much this quickly is because I paint on one area and then leave it to go work on an entirely different area. I suppose my experience as a production supervisor in an imaging and duplication lab many years ago helped hone my skills for organization. Once I understand how something works, I plan accordingly to make all the steps possible weave together to meet a deadline. That means that I do not follow the usual sequence of events, knowing that if I can start one section drying before choosing to work on another, I can return to the first area with fewer problems and keep the flow going. I hope that makes some sense.

The first image shows how easy it is to lengthen the pool. One-point perspective gets easier once a few key point / lines have been determined. So, I simply extended the lines reaching to the vanishing point. And then I painted a solid, opaque color on the edging of the pool. This is to help me see the new pool size and how it relates to the figure. It also insures that I do not get confused on which area was travertine tile and which was pool border.

I include this second image so that you may see what a narrow space I am working in. The Jacuzzi is not even a meter away from the wall.

This last image shows the preparation I am making to allow for transparent water in the pool. You may see the round step “under the water.” The light source or sun is coming from the right. (I chose this side because there is a wide vista window on the wall that is adjacent to my mural. It seemed natural to have the light coming from the direction that real light enters the room. The step gets the most light since it is higher than the pool floor and a horizontal surface that gets more light than most of the vertical planes. I want this area totally dry and set before adding water around the figure.

You may see in this last image that I am doing the same process with the large tree on the right. I have painted the branches that may show in the final painting and I wanted the paint to have LOTS of time to dry. Later I will add foliage and allow that to dry. Lastly, I will paint the flowers. So, in a sense, I am working the whole painting “at once,” as I do one of my fine art paintings.

Wednesday, September 26, 2012

Figure Painting Mural


Cari Amici (Dear Friends),

Hmmm, I have been struggling too much with painting figures with acrylic paint. It dries darker and slightly redder and FAST. So, I tried the idea of painting the shadows in one color and the lights in another. Then I work the transition between tones. In a smaller area such as the transition, I hoped to be able to work fast and keep soft edges.

Still, it has been a struggle for me and I have not been happy with the result. I had been working on this mural from a day that started around 8 a.m. through the entire day, usually going to sleep around 2 a.m. I was slowing down mentally at a time in which I needed to be the sharpest.

Today, I saw my friend Victor, the muralist, and he told me that he only does a tonal value of human figures in acrylic. Then he switches to oil! Sheesh! I left Caprese this past Sunday morning and returned to Firenze. However, I am going back this weekend to fix what I do not like, as well as create what there was not time to finish.

Here are a few more work-in-process shots, including one of some visitors to my “temporary studio.”

Thanks for reading! My book about my street painting in Italy is now available in Amazon.it in Italy, as well as other European Amazons. Check it out on Amazon.it. They even allow you to see some of the inside pages!
You may also order a signed copy directly from me (no extra charge for the inscription) and I will get you a shipping quote from Italy. Contact me directly, please.

Tuesday, September 25, 2012

Mural Design Tuscany Italy

Cari Amici (Dear Friends),

     When I first was offered this mural commission, I was simultaneously excited and intimidated. I knew that I could do it, but there were a lot of new things involved and I was worried about having enough time on the actual painting part of the work. In all honestly, every artwork I create intimidates me a little. I worry that I will not live up to the dream I have for my creation. However, I do not think this intimidation is strong enough to freeze my desires; I think it gives me the drive to do the very best that I can.


     I put a lot of thought into the multi-figure mural composition. I had the criteria the client wanted (three babes, architecture, and Italian countryside, and a pool for the gals). And I mapped out all of the limitations, namely the large wooden “window” in the wall, the size of the Jacuzzi in the room less than one meter from the wall, a sink against the wall on the left, and the space overshadowed on the right when the picture window on the adjacent wall is open. I started to work in a collage type mode, marking my known limitations.


     I am not very good with Photoshop, but I still find it faster to move, flip, and resize things when determining composition. My first step was to map out the dimensions of the wall, locate all of the known furniture issues, and other possibly important lines, such as the magenta lines that correspond to the height of the picture window on the adjacent wall. I had at one point wondered if any window opening I designed should match up with the lines on the other wall. Architects seem to see a certain kind of symmetry in the spaces they design.


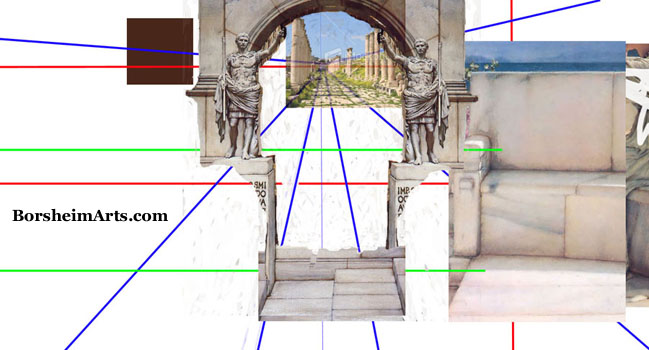
     In the next image, you may see that I added a vanishing point and drew some lines from it to key positions for figures and features. Murals (perspective drawings) are typically designed from one viewing point. Ideally, the mural should look good to a person sitting in the Jacuzzi. I consider the viewer’s position, side to side, as well as at what height his eyes will be. In this case, though, I decided that the door entering the room on the far left would probably be more of a viewer’s point, since many people may stand at the door and look in, while fewer may actually sit in the Jacuzzi. So, I later moved the vanishing point to the left of the center of the wall, keeping the horizon at my eye level (hey, I am an average height).


     The wooden window was my largest obstacle. It just seemed unfortunately placed. But I loved the wood with the iron hinges and therefore did not want to just paint over it, as if it never existed. Instead I decided to feature it and create a scene in which it sort of belonged. Compositionally, I wanted the eye to move around, traveling from figure to figure and to the landscape item featured at the vanishing point. I looked into so many ideas of mathematical forms, such as spirals and triangles. And I looked to two of my favorite artists, Sir Lawrence Alma-Tadema and Sebastiano Ricci for ideas.


     My first design direxion was based on the client’s idea that he envisioned an arched window looking out onto the buildings and landscape. (There were actually three arched windows in the sketch he later showed me that he had done.) I tried to design a wall with an arched window, while having that real window fit into the wall somehow. But the room has a low ceiling and measures approximately 200 x 400 cm. It was almost impossible to make my first idea look airy without the subject becoming way too small to make the impression that I was after. There was just not enough height to create a good looking arch, even though I did consider the slow wide arch of the famous “Bridge of Sighs” in Venice.


      However, just as a scientist often learns: The first failures lead to the new ideas. Once we see what is not working and WHY it does not work, we approach the problem in a new way. But feeling frustrated with the space I had to work with and what I had to fit into it, I saw that my approach was leading me in the opposite direxion I wanted to go. I stewed about a day trying to figure out what exactly was bothering me and I had my “Eureka moment.” A wonderful thing indeed! I was feeling claustrophobic. Identifying my emotion led me to my answer.

      I got away from the computer and took charcoal and paper in hand and started sketching. The next day, I showed the client this very rough idea, and as I said in an earlier blog post, he is the perfect client. He saw what I was going for and jumped on board. From that point on, everything fell into place, just needing refinement as I went along.

     As it turned out, none of the computer collages I did after that or even the perspective drawings contained the entire mural (I am not showing you all versions of the second idea drawings here). Each drawing helped me clarify some part of the composition in a variety of ways, having it all work in my head somehow. Incidentally, I did not worry about my “stealing” images off of the Web. I knew that my final artwork would not be an exact reference to any of the images I borrowed to create the whole of the composition. These were just aids to help me (and mostly my client and our visitors to the mural site) see where I was headed.

     Thanks for reading! My book about my street painting in Italy is now available in Amazon.co.uk in the United Kingdom, as well as other European Amazons. Check it out on Amazon.co.uk. They even allow you to see some of the inside pages!
      You may also order a signed copy directly from me (no extra charge for the inscription) and I will get you a shipping quote from Italy. Contact me directly, please.

Monday, September 24, 2012

Mural Frisket Figure Painting Italy


Cari Amici (Dear Friends),

Mural making is a bit of a different process than my street painting and my fine art painting. Funny how you learn the strengths and process of each system and make it work out all right, even sometimes mixing the things you learn from each different form of art and hopefully making all of your work stronger.

In mural painting, the environment is created first and then the figures are placed inside of it. [In street painting, one usually starts with the face and works out, so as not to step on the art. In my fine art painting, I work the whole composition, bouncing all over to develop the work in a consistent way.] However, speed and efficiency are qualities one strives for when working in the client’s space. It lessens the distraction factor for all lives involved. Thus, most of the work for my mural project here in Italia was done in my own studio in Firenze, Italia, or on the plane, bus, or while walking somewhere. Constantly thinking I am, and compositional “problems” must be solved, as well as keeping to one main idea. Too much of anything usually confuses and tires the audience.

Because of other things going on in my life, my prep time was quite diminished. I did not have time to draw from a live model, always my preference. Thus, I had to work from digital images from a model and her photographer that I hired. Most of the summer, I was not in the same country as she, so logistics meant that I could not even shoot my own images. None-the-less, I work with great people and I cannot believe how easy it all went. Even after I drew the mural on the wall, I discovered that I needed a reshoot of the woman in the pool. I realized why the image I had was not working. It has to do with perspective. But I received a new image the next day, gratefully! Because of the short turn-times, I think these figures look more like photographs than I hope my normal work does.

As in street painting, I gridded out my figures, only this time onto a transparent paper. This is so I can move the paper around on the scene I have created on the wall and see where the figure on the paper looks best before I draw her into the painting. Sure, I know generally where I want each figure, based on my Bozzetto (small drawing), but my bozzetto in this case was one-tenth the size of the wall. No doubt, mathematical errors will be found simply in the enlarging process. My client and I actually had several fun discussions on how we wanted to change things that just did not look or feel right, regardless of the logic we saw in the perspective work. I have to admit that I really enjoyed our dialogues, especially when I reworked the pool a couple of times.

I admit to being lazy at times. So, while I drew in the outlines of the ladies, I decided not to bother with a precise frisket when I drew the woman in the pool. Frisket is basically a masking material with adhesive on one side. It is designed to protect an area from receiving the treatment given to surrounding areas. I used to use a special kind back in the early 1990s when I did restoration work on 4 x 5 inch film transparencies. I am not crazy about using friskets because I do not like the hard edge they always leave. However, this is how it is done and I did not have time to come up with a preferred method. The main point is to not have landscape showing through underneath my figure. Acrylic paint does not have to be opaque, although it does not become less so with time, as oil painting does.

In these next three images, you may see how I tried to minimize the edging by taping INSIDE my figure outline. I must have been drinking too much wine or liquor that night or was simply really tired when I masked the right hand. The rectangular tape shape tells me that I probably just forgot to cut away the tape outside of my line. That slowed me down a bit as I had to paint with extra care the faux stone floor behind the hand. It is so much easier to paint with abandon to get the strokes moving freely right up to an edge, and then remove the tape for a lovely look!

The last image today is a horrible work-in-progress of the third woman in the scene. While my model Anna Rosa posed for me, I had decided to change her face and turn her into a redhead. I also was inventing the clothing and lighting on the torso, since she had posed wearing a short dress. In addition, I used a photo of me taken in San Sebastian, Spain, as a reference for a more horizontal forearm position. I still have work to do on the redhead.

Thanks for reading! My book about my street painting in Italy is now available in Amazon.com in the US, as well as in several European Amazons. Check it out on my home page for an easy link; Amazon even allows you to see some of the inside pages: http://borsheimarts.com/ You may also order a signed copy directly from me (no extra charge for the inscription) and I will get you a shipping quote from Italy. Contact me directly, please.